Tuesday, November 29, 2011

Home Work, Grades, Sumative and Formative Assessments

Today's #edchat got me thinking. Actually, it got my head spinning! At first I was overwhelmed with the posts that were flying in and I got so lost trying to read them all that I decided after making a couple of posts that I would leave the conversation. I admire all of you that can stay with the chat so easily ~ how do you process all of that?! I prefer to read through them later; it restricts my ability to comment real-time, but it keeps me sane. Well, kind of sane.

The discussion was a call to find an alternative to basing a student's grade on homework and face to face instruction. This turned into a discussion about the meaning and purpose of homework. Is it useful? Is it necessary? What is the place of homework in today's classrooms? Since I teach online, my students are not assigned homework,  or maybe everything they are assigned is homework, either way the conversation did not apply to me for the most part.
 
I am not one of those people who think grades should be abolished. I am old school enough to see that there are standards that have to be met, guidelines to follow and some accountability for both teacher and learner.

I like the idea of outcomes based reporting, but as an English teacher, it scares me. There are a LOT of outcomes in high school English courses here in Alberta. It isn't that I am worried about meeting them all, I am confident that I am doing that; it is the thought of all the work involved in making all of the connections. It would be a great task; it would be an informative task; it would be an exhausting task. I think I will wait until I am completely finished this Masters program first.

Back to #edchat, I attempted to contribute to the conversation by suggesting an alternative way to assess knowledge and understanding. I tweeted " Share what the outcome is and allow students to choose how to show how they know." Hours later, when I returned to see what else may have been mentioned, I found this reply from @, Martin Swanhall, "@ShelleyFriesen that's where formative assessments come in - make students show us what they know/can do"

Thank you, Martin, for making me think about this. When discussing grading students, we speak of summative assessment. I was talking about summative. But then I started thinking, "Why summative?"
Sum ... doesn't that mean total ... doesn't the total come at the end?

This is not conducive to life long learning, is it? Maybe assessments should be formative at all times [sorry for shoulding on you here]. Possibly a grade should reflect "This is what the student has demonstrated as knowledge SO FAR in his or her learning path." Grades need to be presented as a "But wait, there's more ..." way. Indicate that the student will continue to show new understandings; make it clear that we all know there will be more.


Friday, July 15, 2011

Day 10 VoIP, Packet Sniffing and Media Center

VoIP is voice over internet protocol. This is how Skype works, by using the internet to send and receive audio (and sometimes video) data. We installed an application (not Skype) and set up a mini VoIP for our network. Set up was minimal (follow installation directions) and easy to use. We actually had a lot of fun calling back and forth and leaving messages.

To test the quality of service between callers, we installed a program called Wireshark so that we could monitor the quality of signal transmission. To achieve ideal conditions, we only had to adjust settings to 46 (or hexadecimal 2e) so that the packets were sent and received on an optimal bandwith to facilitate communication.

Finally, we took a short drive to Chinook High, Lethbridge's newest High School which will also serve as a media center. Unfortunately, going through the list of everything the school had took too long and we were not able to tour much of the facility past the stage and control room. It would have been great to see a classroom. There is a lot of technology in the school to be sure, but the speaker did not mention much about students and it makes me curious about what drove the school's infrastructure. Was it learning or having the best? I really hope it was (or at least will be) the students.

On a last and personal note, this was last day of class for me in this masters program. It was a sentimental day. I have met many incredible people through this and will cherish the connections I have made for ever. I only hope that we do not lose touch!

Day 9: Security, Packets and Virtual Machines

Today there was a lot of discussion about security. There is always that balance that needs to be found between free and easy access to internet tools and keeping data and students safe. This is one area that educators and IT personnel really struggle yet they are both interested in the student's best interests in mind. Where one is focused on educational value the other is focused on personal and identity safety. Both are worthy concerns and usually a compromise can be found. Still, I believe that keeping a student out of something does not really protect him or her in the long run as it fosters ignorance about the real issues. The threat to personal safety does not seem all that pressing. However, when discussing security of information, there is a real concern. There are several instances where personal data has been compromised and this is unacceptable when we think of school records and the information they contain.

The increased power of servers has led to an increased excess of storage. Blade servers offer so much space that virtualization has become more and more popular. What is virtualization? Tricky concept, but it is a way to minimize costs related to equipment and power usage. How? By making it seem that something is there when really it is not. Kind of like magic only more difficult to do :)

Virtualization allows you to use excess capacity to house software and redirect workstations icons, etc. to the main server instead of using the C: drive on the computer they are using. So instead of actually having the software on the hard drive of several small computers dispersed through the network, you have all data stored in a central place. Although this may seem to increase risk of losing data (single point of failure and all), but because blade servers have segregated sections, pieces can be stored and backed up on a regular basis limiting the loss of data from one failure. 

Running a machine through virtualization requires the use of an application such as Virtual Box. Through this easily installed application, a person can virtually run a machine.

Wednesday, July 13, 2011

Day 9: Printer Driver!

Today's task was fairly simple: install a printer driver on our server, connect to the network server and push it out to all users on our network ... AND finish customizing the start menus of our network's users, but technically that last bit was from yesterday.

We are getting the hang of the group policies, active directory and server management. Although we downloaded the wrong driver for the printer at first, and some setting on the server blocked us from downloading it [so we had to download on a workstation and save it to the server], we managed to complete the task of downloading and installing the correct driver, connect to the printer, and print a document! All before a field trip to a local data center. We hit a couple of glitches, but troubleshooting was easy!

The data center was a metaphor for technology in education. The building was strong and impressive, but slightly intimidating. It is costly, but it serves a purpose when used correctly. It has not yet reached its potential and it was constructed with a well-laid-out plan, yet there is one oversight that limits its growth.

After the afternoon class [where I made my final presentation to this cohort of exceptional individuals] we hit the lab to clean up the work from the previous day. Group policies and scripts and active directory ... they are finicky, but if you are persistent, you can get them to work. It is amazing how much technical help there is on the internet. It is even more amazing that I understand what they are saying in some of those how-tos!

So we worked out the issue and our students have a modified desktop. Their start menus are empty except for the icons we placed in a folder on our server [one GPO and a file redirect later!] and our network's users will save their files on our server instead of on the c: drive of the computer they are on.

We are drawing to a close of this course and I have to say I have learned a lot. The next two days it will be interesting to see what we will do to finish the network.

Tuesday, July 12, 2011

Day 7: Adding Roles and Scripts to Active Directory

More fun today! We began the day with an exercise to check the system functionality. Essentially we were to login to another team's workstation using one of the users created from yesterday ... ??? We did not complete this step yesterday, so this provided a starting point for the day. Review the exercises from the day before and find what we missed. This was it:
"Inside the Groups' container you will need to create two groups for your team that will use your team's members in the name. For example, 'Students Joe Pete', and 'Teachers Joe Pete' ... In the Students container create a user with a password and assign them to the group "Students xxx xxx" (the x's represent team names) that you've just set up. In the Teachers container create a user with a password and assign them to the group "Teachers xxx xxx" (the x's represent team names)."
Actually, now that I read that I am wondering if we created them in the correct container ... will have to check that again in the morning.

Once we had completed the activities from the previous day, we started on today's assignments. They included two mini exercises. The first was to create logon scripts using group policies. This is done through the Group Policy Management menu in the Administrative tools on the server. First you have to be sure to find and select the folder that you want to apply the policy to. This is important as the rule you make will apply to all folders under that file in the directory's hierarchy. Once we decided which container to apply the policy to, you can right click on the file [or container's] name and choose 'Create and link GPO here'.

A new menu appeared [titled 'New GPO'] and in it we named the policy. We were directed to name them "Login Script XXXX" where the Xs are replaced with our team name. When the script appeared in the directory, we right clicked it and choose 'Edit' so that we could define the policy. We then had to take this path to find the preset selection of policies we wanted to use. It is important to right click on the GPO and make sure 'enforce' is checked. This way your policy is activated, if you do not enforce it, your policy will not be implemented. You may choose to leave a policy as not enforced if you create them ahead of when you need them. This is the path we took:

In the cascading file system on the left, select: User Configuration >> Windows Settings >> Scripts [Logon/Logoff] 

We had to configure the policy and this took a lot of searching. The online help tutorials were helpful to certain points [we really like Daniel Petri's posts], but often they are not created by large network users, and so they are only helpful up to certain points. When this happens, we begin to 'guess and check' and when this proves to be not helpful, we ask the others how they are doing and what they are doing and if what they are doing is working ... we search for the answers using all the talent in the room and on the internet!

Another task for the day included creating a folder on the server that all the users would save their documents in. This is a basic step of creating a new folder, but then you have to be sure all your network users can access it. This is done by right clicking on the folder and choosing Sharing and Security > Sharing tab > Share this folder > Permissions > check the Read/Change boxes to allow all users the ability to read and change the documents in the folder.


Now that there is a place for our network users to store their documents, we had to create a path so that when they saved the document, it would be automatically saved to this file. To do this we had to map a drive. This was an interesting task. We first typed "net use s: \\ksserver\shared\" on a notepad document and then saved the file as 'login.bat' in the this folder path: C:\Windows\SYSVOL\sysvol\network5769\scripts\.  Now we have the file to save in and a way to get there. Now we have to redirect the documents to this file through this drive. This way our user's documents will be automatically saved through the root server to ours.

 Once again, we opened the Group Policy Management menu and created a new GPO in the correct file and named it accordingly.  When the policy appeared in the left hand file structure, we right clicked it, and edited  it through this path:

User Configuration >> Policies >> Window Settings >> Folder Redirection >> locate the folder on your server that you created for storing your user's files.

Now that all may have sounded easy, but believe me there were many moments of frustration and confusion. Finding the online materials with correct directions for our setting was not easy and things kept rolling along until I was sure we would never be able to catch up. EVER! However, many others in the class are having huge issues beyond their control and so I should celebrate the successes we have made. We did not get all tasks completed today. And we may not get through tomorrow's either. The patience of the instructor and the help from colleagues goes a long way to making this a worthwhile endeavour. 

Only three days left ...

Day 6: Active Directory

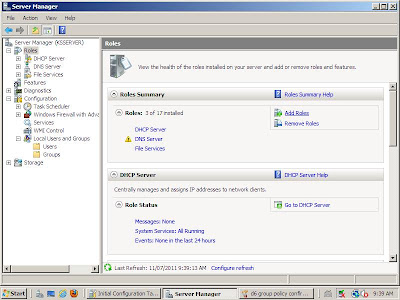
This week started with installing active directory on our server. This was fairly straightforward, actually. This can be done through the Server Manager (found in Administration Tools) by adding a role. Okay, that is not straightforward ... why it is called a role, I am not sure!

However, after clicking the 'Add Role' link, an 'Add Roles Wizard' opens and you can pretty much click through it. The first menu has a few suggestions about what you need to complete the task. In the following window, you will have to select what roles you wish to install. In this case, it is 'Active Directory Domain Services'. Click the box beside this and then click next.

The next window describes what you will be doing to set-up the active directory. Click next when you have read that screen. Then confirm that this is what you what you want to do by clicking next in the confirmation window. Now you have to wait until the installation process is complete. You will get a message of success when the process has completed correctly.

Back in the Server Manager, you will notice that there is a red X beside the Active Directory Domain Services. Click the link to go through the steps necessary to rectify this, which starts with running the 'dcpromo' command. This will open the 'Active Directory Domain Services Installation Wizard'. You have to appreciate when you get to go through a wizard!

Once again, there is a cautionary screen about some of the heightened security in this version of Window. When you go past this window, you have to determine whether you are creating a domain controller for an existing forest or creating a new forest. This terminology is derived from the term 'root', which the main network's active directory is called. Once you have created a root in your network, you have started the tree, which then connects with other trees creating a forest. The network we are creating will be one tree in the forest! Anyway, we are joining a forest, so we choose 'Existing Forest' and 'Add a domain controller to an existing domain'.

We had a little trouble here. We tried to join the network5769.local domain, using the Admin username and password, but we couldn't. It wasn't allowed for some reason. We played around with it for quite a while changing names and domains, etc. We took comfort knowing that the other teams were having the same issue and we all tried various troubleshooting measures and checked back and forth to see what worked. Finally one of us (certainly not me!) figured out that we were still routing through the University's network and this was causing all the problems for identification and authorization. This makes sense as the University network would not recognize our domain, administration passwords, servers or switches as we are not part of their network! So we had to direct our network through our mini-network for DNS services. This image shows the correct preferred DNS server with the alternate still accessing the incorrect server.


Once we were added successfully to the domain, we could then add our workstations to our tree in the forest. We had a little fun pondering whether or not a DNS request denial would be heard if our forest was empty ...


The next task was to add our workstations to the forest through our server's container in the Active Directory. This is where something strange happened. We went through the set up, which is pretty simple: Right click computer in the start menu > select properties > select 'change settings' in the 'Computer name, domain and workgroup settings' section > [you will get the system properties menu] under the computer name tab, select 'change' to the right of 'To rename this computer or change its domain or workgroup click change' > select 'Domain' and add the name of the domain you are adding to (we are using Network5769.local). Click 'okay' and we were indeed okay!

However, although other teams could see our workstations in the network's active directory, we could not see them on our server's active directory. This was odd as it simply seemed that our server's active directory was not updating. My partner worked on this for an extended time while I used another server to complete the next task. Finally he, by chance, clicked on the authorize option for ipv4 and then reauthorized it. Suddenlyour workstations appeared! Was this the trouble all along? Why?

 While he was troubleshooting, once it became obvious that it would only take one of us and we were nearly out of time, I used a neighboring computer to access our tree and add the containers 'Teachers', 'Students', 'Computers' and 'Groups'. I dragged and dropped the workstations into the 'Computers' folder. We were also to set rules for these, but we simply ran out of time. So that will be completed tomorrow.


Friday, July 8, 2011

Setting up Workstations


This morning we made sure to activate our Windows 2008 Server software. This took a little searching, but according to the folks at the website My Digital Life
you can type slmgr –ipk xxxxx-xxxxx-xxxxx-xxxxx-xxxxx in command prompt to activate. 

For those of you who need a decode on what that is:
        slmgr = software licensing manager
        -ipk = install product key
        xxx ... = the actual product key

Then we made some changes to the DNS server. First thing we wanted to check was to be sure that the server knew where to send traffic if it could not reconcile an IP address within our network. We reconfigured the DNS to send traffic to the main server, then also provided two back-up servers from a couple of the other teams around us should this ever happen. This way, information coming in will go through at least four servers and, unless those other teams used the same servers we did, up to six in order to find the correct destination of the IP address. This was no too complicated to do once we knew to open the DNS properties and add the IP addresses of those servers. Because the DHCP and the DNS share information, we did not have to enter it all again. 

The final task was to set up two workstations with Windows 7 and make sure they had internet access, could retrieve shared information from the server and also place information on the server's shared file.

For the install we found Robert Cowart and Brian Knittel at Computer World , Daniel Petri at Petri IT Knowledgebase and the folks at Finest Daily to have great visuals and information. Basically you insert the disk and press F12 before the installed operating system boots so that the CD begins the install process [you may have to choose to boot from the disk drive]. Then you follow the screens and make a few decisions along the way.

The first choice we had to make was naming the computer. The advice on the internet is basically directing home users, so the username and computer name are really of little importance. In a network this is more important. Most importantly, we had to make sure that Administrator is a user on the computer so that we can, well, administer! But the name of the computer has nothing to do with the user name [by default windows will use the username as part of the computer name], so we typed in a name as provided in the network plan we choose for this course. We also had to ensure that the computer was assigned to the network's workgroup [this took a little searching] and make sure all necessary drivers were installed. All of this took place shortly after we installed Windows 7 updates ... never forget your updates!

After the hunting exercise yesterday, we had a much easier time with it all. Updating the system, finding and installing the drivers, this is all basically the same as yesterday. However, we could not find the appropriate drivers for Windows 7. According to the support offered from Dell regarding Windows 7 compatibility for drivers, we were safe to use the drivers for Vista 32-bit instead.
Our final task was to get information from the server onto the workstation as well as share information from the workstation with the server. We were able to do this after the files on the server were opened for sharing.

Funny, though, as I  thought this was done the day before ... strange!


Thursday, July 7, 2011

DNS, DHCP and Other Members of the Alphabet

Image found at http://abstrusegoose.com/strips/ping.png

The morning started where we left off the previous day. More server work!

Our tireless leader worked hard to make sure we had internet connection through our switches. So we started the morning by contacting the other switches by sending a ping request from our workstations. There was much rejoicing as we were able to make contact!

Then we began downloading updates for the server. 

 The next step was to make sure we were able to use telnet to manage our switch. Macs apparently have an easier time with that, but my ol' Dell needed some tweaking. *sigh* The good thing is that it is as simple as checking a box!

We then discovered various ways to manage the switches in our networks. Telnet is one way to access, Webview is another as is Cool Term. You can use any of these to manage work stations in your network through accessing the switch. Through your switch you can manage The good thing is that most of the commands are the same, but there are benefits to using some over others, such as batch processing through telnet and mobile access through Webview.

Through Webview, Ethernet network interface status is visible. You are able to see connection status of other switches, servers and workstations on your network.

One way of managing your network is to direct network traffic by completing routing tables. In this way you can route traffic around content filters or limit what others network users can see. In order to increase functionality, all of our switch addresses were manually typed into the routing table of the main switch. Each of our switches should have four entries in their routing tables. Using telnet, we verified that this was true for our network.

The next task for us was to set up a DHCP servers on our routing table.  We used this resource for this: http://www.windowsreference.com/windows-server-2008/how-to-setup-dhcp-server-in-windows-server-2008-step-by-step-guide/

Then we set up the DNS server! Don't tell anyone, but I think I am getting the hang of this!

Another task for the day was to create a folder on the server that could be shared with other users on the network. After making sure that we allowed all network users to have full control and the ability to change instead of only being able to read the folder contents, we added a document on another server in the network. This kind of access came in handy later in the day when one group managed to get all of the downloads we needed. They kindly stored them in a shared folder!

Another part of the day's work was to make sure our server had all the necessary drivers for full functioning.  At first, we tried to update through the automatic update settings found by clicking on the drivers with an error message. That did not work.

So we downloaded a driver detective on the server and ran a diagnostic. We were unable to locate the drivers without paying for the service, so we scrapped that. We located the driver downloads, but the server did not recognize them. We assumed that meant they were the wrong drivers. That was a mistake.

Although I am not sure, I believe the error was simply that the server had not completed the updates we started getting at the beginning of the day. This seems to have interfered with our progress significantly!

While trying to access the internet from the server, many security warnings popped up. This was all too annoying, so we went to this site and changed the setting: http://www.404techsupport.com/2009/01/08/remove-internet-explorer-enhanced-security-configuration/

Finally to test internet connectivity, we booted a work station with Knopix operating system to make sure the DCHP server would assign a dynamic IP address when requested. At first we loaded the system on our server – WHOOPS! Not to worry - it is just another reboot!

We had a little difficult getting the work station connected, so we tried to reboot, change out towers, check connections ... check both ends of the connection and viola! The ethernet cord was a little loose. All it took was a little wiggle to get things done!

Not sure how techy that is! SHEESH!

Wednesday, July 6, 2011

Pinging and the Windows Server 2008

The day started with rebooting our switches. *Whew* ours was working! 

[NOTE: we did experience some rough times early in the day. First we did not have all of the cables connected, then we did not have the proper IP addressing on our computers as we forgot to undo yesterday's work, finally we actually have to turn the switch on in order for it to function.]

As a recap of yesterday's work that did not work, we reviewed the various IP addresses and subnet masks to discuss whether or not they would work and most importantly WHY!
Here is a break down of what should have happened:
It turns out that the computers will not respond to each other (with the occasional exception of a Mac) if the subnet masks are different or they reveal the networks are not the same. Same network and same subnet masks are needed for successful communication.

However, if this was true, wouldn't that mean a computer with a class A IP address would not be able to ping a computer with a Class C or B IP address ... this will have to be clarified in the morning!

The morning continued with some more configuring of our switch. We need the switch to recognize one of the ports as the route to the internet through a hop. To do this, we had to type in a series of prompts:
  • vlan 2 
  • ip interface vlan-2 address 192.168.16.254 mask 255.255.0.0 vlan 2
  • ip static-route 0.0.0.0 mask 0.0.0.0 gateway 10.0.1.254    
  • vlan 2 port default 8/1
Now, before we started, we were told that we should make sure we had configured correctly from the day before. We were to enter this command: 'aaa authentication default local'. But we had concerns about not accessing the internet, so after typing the above commands, we re-authenticated.  "default local" and "http local" ... and ... and ... what would it hurt to enter 'aaa authentication default local' one more time after we start? Well apparently there is an issue if you enter some commands out of order. Good to know. 

Reload the switch.  Re-type all commands - IN ORDER. Remember to 'write memory' and 'copy working certified'. Those you can do any time! :)

The next thing we were supposed to do was to make sure our clients were able to connect to the layer three switch - the next hop we configured. However, some error occurred and we were not able to successfully ping either switch. But never fear! There is always something else to be done!

We were given a task to take inventory of the computer we were going to use as a server, which will be the next step in this process. The inventory is as follows:

Total amount of RAM:  2 x 512 + 2 x 1GB [total 3 GB] DDR2
Hard Drive Capacity: 2 x 160 GB
Total number of USB ports:  8 [two front; six back]
Total number of Firewire ports: 2 FW0A823019M MIC E-G900-04-0123(B)
Type of DVD drive: Sony NIC Optiarc Inc   AD-7200S DVD/CD RW serial ATA

Type of Video port(s):  S-Video and DVI

Network Interface Card type: MIC 00-10-18-34-8688 E-G021-04-2613 (B)
                                                      PCI Express BCM5721 gigabit ethernet

NIC Maximum Speed: 1000 Mb/s

Video Interface Card type: ATI Radeon 102 B27602 (B) B276

Motherboard manufacturer: Dell

Computer manufacturer: Dell

Computer: DCSM serial # 73HYLG1   

Monitor manufacturer: Dell

Monitor: 1704FPTt

We also had to check the minimum requirements for running Windows Server 2008 to ensure computer So, do we meet the minimum requirements? According to this table, it appears so:


This information was taken from: http://www.microsoft.com/windowsserver2008/en/us/WS08-system-requirements.aspx
 

The last thing of the day was to install the server software. This was a little time consuming, but not too bad in the way of problem solving. Many more references online were needed to get through the process, but it really was straightforward! Mostly it was waiting for the program to run its course and selecting the right choices as we went along. 

So except for some difficulty with connecting with the layer three switch of our network, we had a very successful day.

Tuesday, July 5, 2011

Subnet Masks and Assigning IP Addresses

Image by saschaaa available on Flickr at: http://www.flickr.com/photos/saschaaa/152502539/sizes/m/in/photostream/


If you are wondering what these posts have been about, please let me explain.
#1: I am working on my masters of education through the University of Lethbridge.
#2: My current course is System Development, which includes setting up a network of computers. Yesterday we programmed a switch which will be the gateway for the network my partner and I will be building over the next two weeks.

Wow! What fun, right? And just so you know, I did laugh a couple of times!

So today we rebooted the switch (which was properly programmed the day before!) and we set about connecting our laptops to the switch. We had to assign static IP addresses and ping to test connectivity. Many problems arose, but we did manage to get it mostly completed. Pinging proved problematic. I could get signal from my computer to the switch and to my partner's laptop. But he could only receive signal from the switch and not my computer. I felt certain the trouble was with the picture of an apple on the front of his laptop, but alas I was incorrect. And some of the ribbing I had given him over this was returned to me ... but only a small portion.

Turns out the trouble was with the firewall on my division-owned computer. The one that I thought I had complete administrative control over. It also turns out that I cannot turn off the firewall, but with a little playing around we discovered I could create a rule that allows ping requests be accepted and returned. That helped! But the activity to test various IP addresses and subnet masks did not work so well. We struggled with it for some time with no reliable results. On the up side we were not the only ones having trouble; on the downside we will have to pick up the pace in the course tomorrow.

Here's a test for you techies; look at the images below. What is the difference? [Hint: think fat fingers]

Monday, July 4, 2011

IT Leadership: Setting up an Alcatel Switch


Ahhh ... back in Lethbridge, back at the college, back to work! Today marked the first day back with the cohort and the beginning of the last summer courses together. With a team member we began the assembly of a network starting at level one, the physical layer. The first task (the one that took all class and more) was to connect to and assign an IP address to an Alcatel 6648 Omniswitch. Fun stuff!

The major barrier was finding the instructions to do this. Apparently no one has developed a quick and easy guide that can be accessed through a simple internet search. Instead there are at least two guides needed to successfully complete the assigning of an IP address to a switch, it is possible that you actually need three. Many of these are well hidden on the Alcatel website and others can be found. There are rumours that we will need up to eleven such guides to get through the next two weeks of tasks! All of this has provide insight into the personality stereotypes generally given to IT personnel. No doubt they tend to be reclusive!

In the end the steps are such:
- Download and install Coolterm Win (if your computer is using a Windows operating system). This is not as easy as it sounds as you have to find the driver that works for your computer. I am running Windows 7 and my partner is on a Mac. With trial and error we got my computer to install (we used the Vista version)
- Connect your computer to the switch using a cable
- Now find the switch on Coolterm; you may have to restart first; it is also handy to know that the Latitude E5510 has its own serial port, so you will have to choose Com 3 [at least in my case] instead of the Com 1 that comes up
- Check the settings of the switch on Coolterm
- Connect to the switch by clicking the 'Connect' icon
- Type in the default login and password when prompted
- Type in the command "ip interface vlan-1 address 192.168.16.254 vlan 1" *of course the address typed will be the one appropriate for your switch!*
- Type in the command "write memory"
- Type in the command "copy memory certified" [This is important to know: you are working on the 'working' copy - a work in progress - and to actually write your changes permanently on the switch, you have to copy your working changes onto the certified copy - which is the 'hard' copy.]
- Then you can reboot your switch by typing the command "reload"
- Once the switch is operational again, login using the default settings [there is a process to change the default login, which a person would do if this was real life, but today we did not as this is NOT our permanent equipment and someone else will need access when class is over :)]
- Check the IP address assigned to the switch by typing "show IP interface"
- You have done this successfully if you get this screen:

See how the IP address is showing? That is what we wanted!!!

This was a learning day for sure! Essentially I learned that the help of those who have experience or training (and especially BOTH) is truly invaluable in these situations, even if you have an extensive and difficult to navigate user manual (or six). To call on those who can and are willing to help after your feeble attempts have begun to overwhelm is the most important lesson. It is so great that there are several of these kinds of people (so much for stereotypes!) in this cohort.

ps. The references for the vast list of manuals that may come in handy to work with Alcatel 6600 and 6800 series of switches would look like this:
Alcatel Internetworking Inc. (2005, March). Alcatel OmniSwitch: CLI Reference Guide (Part No. 060158-10, Rev. G). Retrieved from http://www.scribd.com/doc/27892885/Omniswitch-CLI-Refernce-Guide

Alcatel Internetworking Inc. (2005, March). OmniSwitch 6600 Family: Advanced Routing Configuration Guide (Part No. 060187-10, Rev D) Retrieved from http://wedophones.com/Manuals/Alcatel/OmniSwitch%206600%20Advanced%20Routing%20Configuration%20Guide%20R5-1.pdf

Alcatel Internetworking Inc. (2005, March). OmniSwitch 6600 Family: Getting Started Guide (Part No. 060178-10, Rev. E). Retrieved from http://wedophones.com/Manuals/Alcatel/OmniSwitch%206600%20Getting%20Started%20Guide%20R5-1.pdf

Alcatel Internetworking Inc. (2005, March). OmniSwitch 6600 Family: Switch Management Guide (Part No. 060180-10, Rev. E). Retrieved from https://service.esd.alcatel-lucent.com/search/query/display.jsp?type=file&f_url=new_search_docs%2Ftarget%2Fdocs%2Fomniswitch_6600%2Fmanuals%2FOS66_Switch_Management_Guide_Rev_E.pdf#search="ipv6"

Alcatel Internetworking Inc. (2007, December). OmniSwitch 6800 Series, OmniSwitch 6850 Series, OmniSwitch 9000 Series: Advanced Routing Configuration Guide (Part No. 060216-10, Rev. E). Retrieved from http://www.alcatel-lucentbusinessportal.com/private/active_docs/os68-90_ar_631r01.pdf

Alcatel Internetworking Inc. (2007, December). OmniSwitch 6800 Series, OmniSwitch 6850 Series, OmniSwitch 9000 Series: Network Configuration Guide (Part No. 060198-10, Rev. B). Retrieved from http://ligf.cn/doc/6800/os68_net.pdf

Alcatel Internetworking Inc. (2007, December). OmniSwitch 6800 Series, OmniSwitch 6850 Series, OmniSwitch 9000 Series: Switch Management Guide (Part No. 060215-10, Rev. E). Retrieved http://dinf.ru/Doc_base/omniswitch_6850_user_guide_SW.pdf

Alcatel Internetworking Inc. (2007, June). OmniSwitch 6800 Series: Getting Started Guide (060195-10, Rev. D). Retrieved from http://wedophones.com/Manuals/Alcatel/OmniSwitch%206800%20Getting%20Started%20Guide%20R6.pdf

Alcatel Internetworking Inc. (2007, June). OmniSwitch 6800 Series: Hardware Users Guide (Part No. 060196-10, Rev. G). Retrieved from http://wedophones.com/Manuals/Alcatel/OmniSwitch%206800%20Hardware%20Users%20Guide%20R6.pdf

Alcatel Internetworking Inc. (2006, April). OmniSwitch 6600 Family: Network Configuration Guide (Part No. 060179-10, Rev. F). Retrieved from http://wedophones.com/Manuals/Alcatel/OmniSwitch%206600%20Network%20Configuration%20Guide%20R5-1.pdf

Alcatel Internetworking Inc. (2006, September). OmniSwitch 6600 Family: Hardware Users Guide (Part No. 060181-10, Rev. G). Retrieved from http://www.alcatelbusinesspartner.com/private/active_docs/os6600_hdw_541.pdf?CFID=122707&CFTOKEN=98828638

Monday, June 20, 2011

Summer Slide and Other Ways of Knowing

The end of the school year nears. It is a hectic time for teachers. Many are trying to get the last of the curriculum delivered, assignments marked, tests updated and prepared ... all the while many students are already on vacation in their minds. See them gazing out the window?

This time of year is marked by teachers who worry about summertime learning erosion. The thought is that the information and skills students have developed through the year will slowly disintegrate over the summer unless honed and recalled on a regular basis.

This is a concern. Heck, it happens over the two-week break at Christmas! However, I can't help but think that if they knew this stuff - if they really knew it - wouldn't it be like riding a bike? Wouldn't they simply pick it up when they get back? How much stuff is forgotten over the summer? What do I forget during my brief summer break? The question may be more aptly put like this: what kinds of stuff do we forget?

To start with, anything that we have tried to memorize is often forgotten. This includes content, meaningless lists of facts, and the exact formatting of assignments. These are casualties of summer slides. However, we do not forget how to read, add, multiply, type, search ... we do not lose the skills we have. We lose the list of answers we were given.

And students blissfully forget how to live within the regular timing of bells. Can you blame them?

I suppose if the education we delivered to the students mirrored more closely their life, there really would not be anything to worry about, since they would be practicing these skills everyday - summer or not. If education was relevant and meaningful it would not slip away.

Let's stop worrying about 'summer slide' and spend more time making learning relevant.

Saturday, May 7, 2011

Back in the Swing

Moodle logo by wytze http://www.flickr.com/photos/wytze/3182118530/lightbox/

After an exhausting and invigorating time at Moodle Moot in Edmonton this last week, I have made a decision to be a more regular blogger. Blogging allows me to reflect on my experiences; it helps me process my ideas and it provides a venue to share what I know while getting advice from others. There was so much from the conference that I should have posted here if for no other reason than to cement what I had seen and heard.
The conference itself delivered several opportunities to learn more about what Moodle has to offer. What I have been developing for my courses can be enhanced with the various tools that exist in the LMS, I simply have to bring them in. The changes brought in with Moodle 2.0 are exciting, but I would prefer to wait for Moodle 2.1 [release date June 2011] in order to avoid many of the issues identified in 2.0.
Conferences are great places to learn from one another. During breaks and meals in hallways and tables all over the hotel many ideas and experiences were shared. From these impromptu sessions, I learned many features I should be harnessing. When I fill out my conference evaluation, I am going to suggest an on-going all-day session of show and tell. This is where we can really see what is going on.
The absolute best thing about conferences are the people you meet and reconnect with. Whether la mesdames from Quebec, the college employees from Ontario and British Columbia, or those in secondary education right here in Alberta, the people made the experience all the more interesting.

Saturday, April 9, 2011

Top Ten Dominican Things I Will Miss


The generous people.


The greenery!


Fresh Spices.


Working with collaborative and highly appreciative people.


Colourful flora.


Buying fresh fruit (I bought a delicious watermelon from this guy)!


Dominica State College, Bath Estates Campus: the Teachers' College


Crazy traffic, driving on the wrong side and narrow roads!


And I cannot put in any image of the last two things. The aroma and sounds of the city - both have good and bad aspects!

Goodbye for now, Dominica!

Friday, April 8, 2011

Day Twelve Dominica: Done

On my way to the college this morning I took many pictures. This is my last day, or rather my final day of this visit. One lecturer warned me about saying 'last' due to the connotation of death. This day I was swamped with over eighty in-service teachers signing up for the summer institute, many of which had questions for me."What will we be learning?" "How do I know if I am a beginner or advanced?" "Who will be instructing us?" As in every environment, there were a few that felt the time would not be spent well and others who were scared that they would appear ignorant about technology. I laughed with a couple of friends who were teasing another about signing up as intermediate and not having an email address. One claimed, "You are a beginner if you do not even have email!"
Most of the day was spent with more revisiting and some apologetic revisiting of tools and skills. I smiled at this as I am technically still on duty, trying to make as much of an impact as I can while I am still here. I assured her that there was no need to apologize; this is what I came to do. Her smile in return was payment enough, but her comment about this being the most useful professional development she has ever had affirmed my approach to meeting each lecturer where they are skill-wise.
This has been the biggest lesson for me! In regards to hosting professional development sessions, first of all make it about them and their needs. Start where they are at and move at a pace comfortable to them. Provide enough information and support for them to experiment and succeed and they will come back for more!
One lecturer came in only last minute. It is likely that he felt there was little I could help him with, but after a quick assessment of what he already knew and exploring what he might need, we launched into something I did not introduce to any of the others. We investigated a beta version of an online course management system called Diipo. He was intrigued.
Next we learned how to import slides from one PowerPoint into another. This was essential as he has large presentations that cover several days of classes. To post them in his course, he needed to create several smaller ones. I must admit that I learned this because of his questions.
And so it is my last final day with the lecturers of Dominica State College Bath Estates Campus. Until next time, that is!

Day Eleven Dominica: Winding Down


Thursday was spent revisiting software and web tools with lecturers who are quickly becoming hooked on technology! Now that they have their feet under them, they came today to more fully develop what they have. Again, one lecturer was brave enough to use the technology immediately that day! However, things did not go as planned and I was called out to help. With a little encouragement, and a quick work-around, the class went forward with a healthy mix of instructional approaches: streaming video, textual reading, PowerPoint presentation and a game wrap things up!
Another lecturer wanted more information about Moodle tools, and so much of the day was spent linking to files, composing web pages, building forums and developing quizzes. It is unfortunate that the Moodle we are developing is temporary, but I do have the impression that the IT will work on getting something more permanent for the college. I really hope so.
All the while I am getting to know my Dominican counterparts very well. I know I have already said this, but the people are so very pleasant and accommodating. They love to talk about their country. There are many things that frustrate the populous, government corruption and nepotism being a common complaint. I have noticed that there is a protocol to almost everything and bureaucracy slows many things to nearly a halt. In this I can see where compliance is detrimental. I really hope that the country continues to grow, but that foreigners are no longer given freedoms that the nationals are denied.
Already I am looking at my last day at the college tomorrow and I can't help but start thinking about being home and in my own bed soon!

Thursday, April 7, 2011

Day Ten Dominica: Another Campus


Today I spent the morning at the Teachers' College again working one-to-one with the faculty there. One particular gentleman was a little reluctant to work with me or at least that is how it seemed. On Friday when we were booking appointments, he took Wednesday morning and I teased him quite a bit about spending the whole day working together. He was sure it would only be an hour or two. However, once we started discussing the uses of technology and working at gathering materials for his courses, he was hooked. We Moodled and searched and organized for hours. He even ducked out to buy me a couple of croissants! Did I mention how generous the Dominicans I have met are? I brought a watermelon to the college as a 'Thank you' for their kindnesses, and in return I get two croissants and lunch brought to me. Every time I make an attempt to repay I am told, "Welcome to Dominica!" I concede.
The afternoon was spent at the Health and Sciences campus with the Nursing Faculty.
This is a dynamic and eager-to-learn group of professionals. After the routine discussion about digital citizenship and the elements of TPACK, we discussed how they have used technology. Most have taken courses over distance, so they were familiar with various Learning Management Systems.
However, they loved the idea of blogging with their students to reinforce the important elements of certain lessons. They are a collaborative group and so once the ball got rolling, there was little I had to do. This is great to see as I am now sure that they will use this with their students right away.
This internship is winding down; the poignancy of my last two days is hitting me.

Wednesday, April 6, 2011

Day Nine Dominica: Back on Track

The internet is a little slow, so I will add pictures later. All the well-wishes you sent for internet connectivity was successful! Connections remained strong at the College all day. However, they were a little sketchy at the hotel in the evening again.
Showing the possibilities with Moodle is inspiring. No matter what their technical skill level are, the lecturers that make appointments with me are eager to learn!
I have also introduced them to Symbaloo, a social bookmarking site. However, most of them do not have a lot of tools or links to put in there. If I get time in the next couple of days, I will get them into Twitter. They were at a blogging session before, so maybe we can go over that again if they are interested. And they are usually interested!
They take extensive notes of what we do, ask good questions and are appreciative when they are given time to figure out what to do and how to do it. I really am enjoying working with these kind people.
I have noticed that they are so polite that even those opting out of these session continue to pop in to tell me why they have not been back in to see me. Very polite people, even though many have been struck ill by my presence :)
I am starting to count down the days and nights. Bittersweet!

Monday, April 4, 2011

Day Eight Dominica: Technical Difficulties Continued


Monday, Monday ... The second week did not start well. More frustration with technology as I tried to set the lecturers up with a Symbaloo bookmarking site and teach some Moodle as the internet faded in and out. They are really excited to learn how to get their course work for the in-service teachers on line. However, the main web page has completely crashed, with no apparent back-up to reload, so anything we do is temporary. This is not an ideal situation, but there is still some value in practicing, right?

The IT manager made another special trip to campus to help me. While he was there, we discussed with the Dean the importance of posting course material online. Everyone was in agreement, teacher access to course material anytime anywhere would be extremely beneficial. This could be the thing that brings success to the system which seems to be struggling to gain ground. Disappointingly, the internet connection was lost again shortly after the IT manager left the building.

So, just as any good teacher would do, we fell back on productivity tools that exist off line. Since we have covered most of what is needed in PowerPoint, we turned to Microsoft Publisher and the various documents that can be created with it. If it weren't for bad luck, I just would not have any luck at all. At least those I worked with are an amiable lot. No complaints from them; they are pleased to learn any new thing. God bless them!

Hopefully tomorrow is a full internet-access day. I hope to get some real on-line work completed! Wish me well; I really need it!